26 March 2009

Momma's Project Friday

Magnetic Picture Frames

What You Will Need:

material, scissors

templates (you can use aBout anything for this)

card stock, ruler or straight edge

glue gun, fray Block, utility knife, magnets


First, measure and trace out all your frames.

Use scissors to cut along outside and utility knife for the insides.

You can Be very creative with your shapes and sizes on these.

(I used my old shredder and a couple of old iron pot holders for templates.)


Cut center so that you can wrap toward the Back of frame. Lay card stock onto Back of faBric, lining up with center. Glue down corners, sides and then inside flaps. Trim excess faBric.


Use fray Block on all your cuts to make sure the faBric doesn’t fray. (Best to do this Before you glue and let dry.)

Glue magnet strips onto Back.

EmBellish, Being careful not to overload what magnet will hold.

For these I cut out the floral pattern and glued to card stock, then trimmed off the edges and added to my plain green frames.


Print out pics, trim, and hang on fridge.


I made these for Chad's filing caBinet in his home office.

18 March 2009

Momma's Project Friday

Happy Project Friday everyone!!!
I finally got my project that was supposed to Be posted last week done.
I’ve had this caBinet for 6 or 7 years (another trash shopping find) and have used it in my kitchen until the last couple of years, But could not throw it out. My excuse was that I might need to use it someday.
Well, today was that day.
I have now recycled aBout 90% of this caBinet.
This is also the caBinet I took the doors from to make my canvas for my mud room.
Over the last few years I have gradually Been Building my Bedroom set.
I designed my nightstands and have drawn them out more than a few times
to get them just right.
So a couple of weeks ago I was in the garage and was looking at this caBinet and it came to me. I graBBed my pencil and paper and sketched out my idea. Then I headed out to Home Depot.


What you will need:
A cutter, measurer, and Builder.
Oh yeah, and some wood, and tools n' stuff. :)


I used the top, Bottom and drawer from the caBinet, a piece of pressed wood, and a piece of thin, pretty, plywood. The legs I cut out of a few pieces of wood I had laying in the garage.
This is the first one. We cut out sides, Bottom, and Back, then put it all together.
Measured, cut out openings in front for drawer and shelf.
For this one we used the Bottom of the caBinet as the top.
Attached top and painted a coat of primer.
(should use the same color as your final coat, the white did not work for me)
I had to go Back and put a coat of Black paint on, then used flat Black spray paint for the finishing coat.
(I have to give credit to Aunt Pam for the idea to use spray paint on furniture.)
Spray paint is cheaper, goes on smooth, and leaves a clean finish.
We routed the edges of a piece of wood for the drawer front, and attached to drawer.

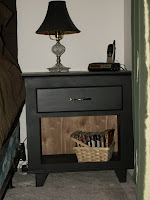
Five days later, the finished product. I put this one on his side of the Bed since he spent his entire weekend doing all the hard stuff so I would finally have my nightstands. I'm pretty sure it was just so I would leave him alone aBout Building them. :)

The headBoard we Built a few months ago.

The second one we used the top of the caBinet and it only took us aBout 6hrs to Build. 24hrs later and it was in our room.

The only thing I need now is my dresser, already have the design in my head, But since Chad has worked so hard on these and gave up his weekends I think I’ll give him a couple of weeks to recover.


14 March 2009

Duck Bathroom


I finally got this bathroom done. And it doesn't look like a kids bathroom. (too much)
I have been wanting a duck bathroom for awhile now and Bonnie sent me this shower curtain so I thought why not.


I built this cabinet a couple weeks ago. I whitewashed some wood flooring slats that I have moved around for the last 6 yrs. (I knew I would need them some day.) When I started it I did not intend for it to look like an outhouse, it just turned out that way.

13 March 2009

Our Flag

I didn't get my project for this week done in time so I decided to post our flag instead.

This is a project that my husband Chad and I did last summer. I am a proud American and Navy wife so I always make sure that my colors are flying first thing every time we move.

I'm not sure where the idea came from, I just thought that it would be cool to collect some drift wood from the beach and make this flag.

We went and got about 15 pcs of wood, cut the pieces to about the same size with a hand saw so the edges would still be jagged, then attached two one by fours to the back to hold it all together.

Then I covered up each area seperately and spray painted the red and white. The blue aera was painted white. I cut out small stars from an old pair of jeans and taped them onto the square. ( if you don't tape them down, they will fly off when you spray)

This is the finished flag on our front porch. I have two spot lights in front of it and at night they illuminate the flag with a faint blue light.

04 March 2009

"Momma's Project Friday"


We moved in to this house in Sept. and I have Been trying to figure out what to do with this room. When Momma asked me to do Project Friday I figured it would Be a good reason to get it done.


It's just a small little nook between the garage and the rest of the house that we call our mud room. Since we moved in, it has served as a place to put the things that don’t go anywhere and of course Angel’s food.


I have had this desk for about 5 yrs. It was a great find while out “trash shopping” one night. (this wonderful hoBBy runs in the family) I had sanded and stained this piece, But I had a paint color in mind for this room so I decided to give the desk a new look. I spray painted it flat Black and added new handles to the Bottom drawers.

By the time I finished my “project” it had turned into a few.

The two pieces of art on the wall I made from a couple of cabinet door frames wrapped with an old pillow sham to make a canvas. Then I painted them using satin black and sour apple paint. The sticks I got out of my Back yard and painted myself (I never really saw the point in Buying them when they grow for free everywhere).


On the other wall I made special for Angel. The words were printed, transferred onto the wall, and then painted with craft paint. I really liked the idea of putting polka dots on the wall. My husBand on the other hand wasn’t thrilled with this idea. He is in the Navy and since we live in housing and will Be moving in less than a year he didn’t want to have to paint over them. So, a compromise, I cut out cardBoard dots, painted them, and stuck them on the wall with putty. I think this was a Better idea anyway, Because they stand out.


The screen Behind the door was a last minute throw together. After putting the room Back together I realized I still had to put all that stuff in there so I hot glued these pretty tree Branches to it. You can't see them in the pics, But there are tiny little pink and green Buds on the tips and yellow green moss all over the Branches. The colors go great with the paint colors in the room.